Thank you to Saint Francis University, Joanna Kwok 郭美德 for her invitation!
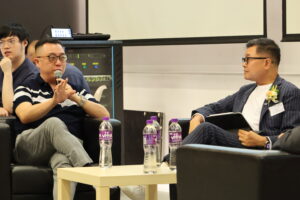
Last Tuesday (June 23), I had the privilege of serving as a panelist at Saint

Dingtalk is more than just a communication platform—it offers powerful AI tools that make organizing events and managing registrations effortless. One of the most convenient methods is using the Dingtalk AI Spreadsheet to create forms for event registration and then sharing them directly on your website. Here’s a step-by-step guide for doing this:
Benefits of Using Dingtalk AI Spreadsheet for Event Registration
By following these steps, you’ll have a complete workflow from creating the form in Dingtalk to publishing it on your website for attendees to register quickly and securely.
Text by: Michael C.S. So, AiX Society – Hong Kong | Malaysia
Last Tuesday (June 23), I had the privilege of serving as a panelist at Saint

In recent years, a striking term has emerged in the technology world: biocomputing. At first

誠邀各位企業創辦人、CEO、CXO、CTO 及管理層參加 AiX Society 領袖交流早餐會。 在 AI First 時代,企業正面臨前所未有的轉型機遇與挑戰。我們將透過輕鬆而深入的早餐交流,分享 AI Agent、Digital Workforce 及企業 AI 轉型的最新趨勢與實戰經驗,並與來自不同行業的企業領袖建立高價值人脈網絡。
HKOEA Consultancy
Licence No. 59684
© 2026 Artificial Intellegence Application Research Society. All rights reserved
by Originals Group – Hong Kong, Malaysia, GBA